I like using Angular Material for creating consistent layouts in web applications. Most of these components can be used in reactive forms out-of-the-box, but there is one component that needs a little bit of extra code for managing the validation and that is MatChipList. When I last needed this component, I only wanted to allow values from a list. Therefore, I added Autocomplete to the component. Let’s see how I did this. There are probably also other ways to do this, maybe even better ways. If you have suggestions, you may always comment below.
Adding Reactive Forms and Angular Material Modules
To create an application with Angular Material (and optionally create a custom theme), you can view my post Creating themes with Angular Material.
To start creating a Reactive Form with Angular Material, I have to import the modules I need in our module. After importing the required modules, the app.module.ts, should look like this:
import { BrowserModule } from '@angular/platform-browser';
import { NgModule } from '@angular/core';

import { AppComponent } from './app.component';
import { BrowserAnimationsModule } from '@angular/platform-browser/animations';

import { MatButtonModule } from '@angular/material/button';
import { MatToolbarModule } from '@angular/material/toolbar';
import { MatChipsModule } from '@angular/material/chips';
import { MatIconModule } from '@angular/material/icon';
import { MatInputModule } from '@angular/material/input';
import { FormsModule, ReactiveFormsModule } from '@angular/forms';
import { MatAutocompleteModule } from '@angular/material/autocomplete';
import { MatOptionModule } from '@angular/material/core';

@NgModule({
  declarations: [
    AppComponent
  ],
  imports: [
    BrowserModule,
    BrowserAnimationsModule,
    FormsModule,
    ReactiveFormsModule,
    MatToolbarModule,
    MatButtonModule,
    MatIconModule,
    MatInputModule,
    MatChipsModule,
    MatAutocompleteModule,
    MatOptionModule
  ],
  providers: [],
  bootstrap: [AppComponent]
})
export class AppModule { }
Creating the Reactive Form
I’m going to create a simple form with fields for your first name, last name and your favourite fruits. For your favourite fruits, I’m going to use MatChipList with autocomplete.
First, I’m going to create the Reactive Form using the FormBuilder. In the ngOnInit-method, I’m getting a user from a constant value (to mock getting a user from a back end).
import { Component, ViewChild, OnInit } from '@angular/core';
import { FormGroup, FormBuilder, Validators, FormControl } from '@angular/forms';
import { User } from './user';
import { Fruit } from './fruit';

const user = {
  firstName: 'Lindsey',
  lastName: 'Broos',
  fruits: [
    { id: 1, name: 'lemon' },
    { id: 4, name: 'strawberry' }]
};

@Component({
  selector: 'app-root',
  templateUrl: './app.component.html',
  styleUrls: ['./app.component.scss']
})

export class AppComponent implements OnInit {
  public userForm: FormGroup;
  public user: User;
  public fruits = [
    { id: 1, name: 'lemon' },
    { id: 2, name: 'lime' },
    { id: 3, name: 'orange' },
    { id: 4, name: 'strawberry' },
    { id: 5, name: 'raspberry' }];

  constructor(public fb: FormBuilder) { }

  ngOnInit(): void {
    this.user = user;
    this.buildUserForm();
  }

  public hasError = (controlName: string, errorName: string) => {
    return this.userForm.controls[controlName].hasError(errorName);
  }

  public submitForm(): void {
    console.log(this.user);
  }

  private buildUserForm(): void {
    this.userForm = this.fb.group({
      firstName: [this.user.firstName, Validators.required],
      lastName: [this.user.lastName, Validators.required],
      fruits: [this.user.fruits],
    });
  }
}
In our app.components.html, I already create the form without the chiplist.
<mat-toolbar color="primary">
  <span class="title">Angular Material Chiplist with Autocomplete and Validation Demo</span>
</mat-toolbar>

<form [formGroup]="userForm" (ngSubmit)="submitForm()" novalidate>
  <!-- Firstname -->
  <mat-form-field>
    <mat-label>Firstname *</mat-label>
    <input matInput type="text" id="firstName" formControlName="firstName">
    <mat-error *ngIf="hasError('firstName', 'required')">Required
    </mat-error>
    <mat-error *ngIf="hasError('firstName', 'maxlength')">Maximum length is 100 characters
    </mat-error>
  </mat-form-field>

  <!-- Firstname -->
  <mat-form-field>
    <mat-label>LastName *</mat-label>
    <input matInput type="text" id="lastName" formControlName="lastName">
    <mat-error *ngIf="hasError('lastName', 'required')">Required
    </mat-error>
    <mat-error *ngIf="hasError('lastName', 'maxlength')">Maximum length is 100 characters
    </mat-error>
  </mat-form-field>

  <!-- Submit -->
  <div class="button-wrapper">
    <button mat-flat-button color="primary">Submit</button>
  </div>

</form>
MatChipList with Autocomplete and Validation
In app.component.html, I add the following mat-form-field below the mat-form-field for the lastname.
 <!-- Favorite fruits -->
  <mat-form-field>
    <mat-chip-list #fruitList>
      <mat-chip *ngFor="let fruit of user.fruits" [removable]="removable" (removed)="remove(fruit)">
        {{fruit.name}}
        <mat-icon matChipRemove *ngIf="removable">cancel</mat-icon>
      </mat-chip>
      <input #fruitInput placeholder="Add your favorite fruits" [matChipInputFor]="fruitList"
        [matChipInputSeparatorKeyCodes]="separatorKeysCodes" [matChipInputAddOnBlur]="addOnBlur"
        (matChipInputTokenEnd)="addFruit($event)" [matAutocomplete]="fruitsAutocomplete" formControlName="fruitInput">
    </mat-chip-list>
    <mat-autocomplete #fruitsAutocomplete="matAutocomplete" (optionSelected)="selectFruit($event);">
      <mat-option *ngFor="let fruit of filteredFruits$ | async" [value]="fruit">
        {{fruit.name}}
      </mat-option>
    </mat-autocomplete>
    <mat-error>At least 1 fruit need to be added</mat-error>
  </mat-form-field>
Here I first add a mat-chip-list for displaying the favourite fruits of the user and make these chips removable. In this mat-chip-list there’s an input-field that is linked to the mat-autocomplete component. The input-field also has a few attributes necessary for the chiplist. If you start typing in this input-field, you get the autocomplete list, but you can also add fruits (when they are available in the autocomplete-list) by typing the complete name and pressing enter or a comma (specified in matChipInputSeparatorKeyCodes). When adding fruit like this, you use the addFruit-method. Adding fruit via selecting a value from the autocomplete, you use the selectFruit-method. To get the value you type, I added an extra formControl to the userForm named fruitInput.
In the app.component.ts, I added a few properties that I need.
export class AppComponent implements OnInit {
  ...
  public removable = true;
  public addOnBlur = true;
  public filteredFruits$: Observable<Fruit[]>;

  @ViewChild('fruitList') fruitList: MatChipList;

  readonly separatorKeysCodes: number[] = [ENTER, COMMA];

  constructor(public fb: FormBuilder) { }
  ...
}
The chiplist needs the first 2 properties (removable and addOnBlur). I created an observable for the filtered fruits and I added the MatChipList as a ViewChild, because I need this for the custom validation of the fruits.
The following reflects the changes I made in the buildUserForm-method.
private buildUserForm(): void {
    this.userForm = this.fb.group({
      firstName: [this.user.firstName, Validators.required],
      lastName: [this.user.lastName, Validators.required],
      fruitInput: [null],
      fruits: [this.user.fruits, this.validateFruits],
    });

    this.userForm.get('fruits').statusChanges.subscribe(
      status => this.fruitList.errorState = status === 'INVALID'
    );

    this.filteredFruits$ = this.userForm.get('fruitInput').valueChanges
      .pipe(
        startWith(''),
        map(value => this.fruitFilter(value))
      );
  }

private fruitFilter(value: any): Fruit[] {
    const filterValue = (value === null || value instanceof Object) ? '' : value.toLowerCase();
    const matches = this.fruits.filter(fruit =>
      fruit.name.toLowerCase().includes(filterValue));
    const formValue = this.userForm.get('fruits').value;
    return formValue === null ? matches : matches.filter(x =>
      !(formValue.find(y => y.id === x.id))
    );
  }

  private validateFruits(fruits: FormControl) {
    if (fruits.value && fruits.value.length === 0) {
      return {
        validateFruitsArray: { valid: false }
      };
    }

    return null;
  }
I added the fruitInput formControl to the userForm and I added custom validation to fruits. I subscribe to the statusChanges of the fruits-formControl, so I get set the chipList in an errorState if the fruits-formControl is invalid.
In the buildUserForm-method I also subscribe to the valueChanges of the fruitInput-formControl. When this input changes, I want to filter the fruits and only display the filtered fruits.
The only methods, I have to add now are the methods to add and remove a fruit. These methods are the following:
 public selectFruit(event: MatAutocompleteSelectedEvent): void {
    if (!event.option) {
      return;
    }

    const value = event.option.value;

    if (value && value instanceof Object && !this.user.fruits.includes(value)) {
      this.user.fruits.push(value);
      this.userForm.get('fruits').setValue(this.user.fruits);
      this.userForm.get('fruitInput').setValue('');
    }
  }

  public addFruit(event: MatChipInputEvent): void {
    const input = event.input;
    const value = event.value;

    if ((value).trim()) {
      const matches = this.fruits.filter(fruit =>
        fruit.name.toLowerCase() === value);
      const formValue = this.userForm.get('fruits').value;
      const matchesNotYetSelected = formValue === null ? matches : matches.filter(x =>
        !(formValue.find(y => y.id === x.id)));
      if (matchesNotYetSelected.length === 1) {
        this.user.fruits.push(matchesNotYetSelected[0]);
        this.userForm.get('fruits').setValue(this.user.fruits);
        this.userForm.get('fruitInput').setValue('');
      }
    }

    // Reset the input value
    if (input) {
      input.value = '';
    }
  }

  public remove(fruit: Fruit) {
    const index = this.user.fruits.indexOf(fruit);
    if (index >= 0) {
      this.user.fruits.splice(index, 1);
      this.userForm.get('fruits').setValue(this.user.fruits);
      this.userForm.get('fruitInput').setValue('');
    }
  }
The running application
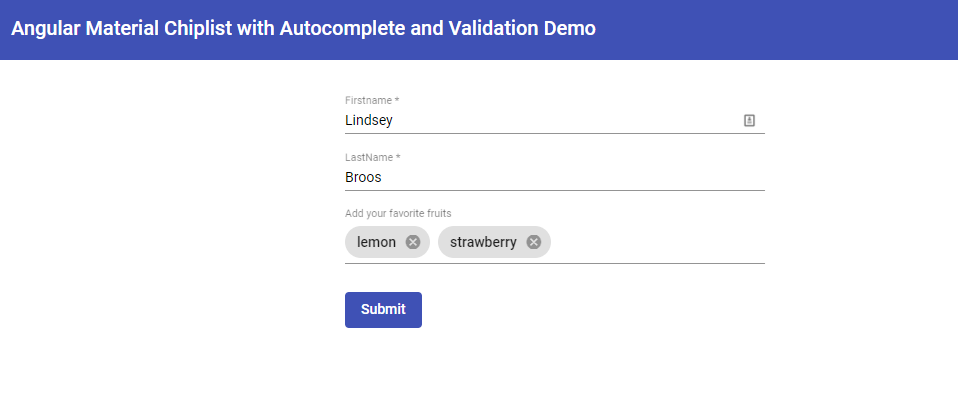
When we now run our application, we get the following:
After deleting all entries, you see the errors.

When you tab in the fruit input-field, you get the autocomplete list of available fruits

Once a fruit was added, it’s no longer available in the autocomplete-list.

I hope this can help you when creating a Reactive Form with Angular Material Chiplist with autocomplete and validation. If you have suggestions to do this in a better way, feel free to add a comment. You can find the code on my Github.
Hello I did your example on Stackblitz. Here the link : https://stackblitz.com/edit/angular-chip-with-autocomplete-and-validation?file=src/app/app.component.ts
hey thank you very much for making a stackblitz example of this!!
Thanks for the Stackblitz!
Hello, I was implementing this code; but it does not allow to edit the values of firstName and lastName
Change them if they are reflected in the UserForm
Thank you for this post! this is exactly what I was looking for