Barcodes are widely used in many contexts, in hospitals (ranging from patient identification to medication management), to keep track of objects or people (airline luggage or entrance tickets for events), to guide people to a certain URL, … Therefore barcode scanning is a common functionality in many mobile applications. The open-source library ZXing.Net.Mobile makes this easy to implement in your Xamarin.Forms application with only a few lines of code.
Adding the NuGet packages
The first thing you need to do is installing the NuGet package ZXing.Net.Mobile.Forms in all your projects (in the shared code project and the platform-specific ones). In your Android project, you also need to add the NuGet package ZXing.Net.Mobile. In the shared project and the iOS project, this package will be automatically added when you add ZXing.Net.Mobile.Forms.

Using ZXing and handling permissions
To start using ZXing in your project, you need to initialize ZXing and request the right permissions. For barcode scanning, you need permission to access the camera and optionally permission to toggle the torch (in Android this is a separate permission).
Android
To initialize ZXing in Android, you add a few lines of code in your MainActivity.cs. In the OnCreate method, you need to add a line to initialize ZXing and you also need to add an extra method for handling the needed permissions. After adding the code your MainActivity should look like this.
[Activity(Label = "ScanDemo", Icon = "@mipmap/icon", Theme = "@style/MainTheme", MainLauncher = true,
ScreenOrientation = ScreenOrientation.Portrait, ConfigurationChanges = ConfigChanges.ScreenSize | ConfigChanges.Orientation)]
public class MainActivity : global::Xamarin.Forms.Platform.Android.FormsAppCompatActivity
{
    protected override void OnCreate(Bundle savedInstanceState)
    {
        TabLayoutResource = Resource.Layout.Tabbar;
        ToolbarResource = Resource.Layout.Toolbar;
        base.OnCreate(savedInstanceState);

        Xamarin.Essentials.Platform.Init(this, savedInstanceState);
        global::Xamarin.Forms.Forms.Init(this, savedInstanceState);

        // Add this line of code
        ZXing.Net.Mobile.Forms.Android.Platform.Init();
        LoadApplication(new App());
    }

    // Add this method
    public override void OnRequestPermissionsResult(int requestCode,
    string[] permissions, [GeneratedEnum] Android.Content.PM.Permission[] grantResults)
    {
        Xamarin.Essentials.Platform.OnRequestPermissionsResult(requestCode, permissions, grantResults);
        global::ZXing.Net.Mobile.Android.PermissionsHandler.OnRequestPermissionsResult(requestCode, permissions, grantResults);

        base.OnRequestPermissionsResult(requestCode, permissions, grantResults);
    }
}
To add the camera-permission, you open the AndroidManifest.xml file and add the permission. If you want to add the ability to use the flashlight, you also need to add that permission. The AndroidManifest.xml will look like this.
<?xml version="1.0" encoding="utf-8"?>
<manifest xmlns:android="http://schemas.android.com/apk/res/android"
          android:versionCode="1"
          android:versionName="1.0"
          package="com.companyname.myapp">
  <uses-sdk android:minSdkVersion="21" android:targetSdkVersion="28" />
  <application android:label="MyApp.Android"></application>
  <uses-permission android:name="android.permission.ACCESS_NETWORK_STATE" />

  <!-- Add these two permissions -->
  <uses-permission android:name="android.permission.CAMERA" />
  <uses-permission android:name="android.permission.FLASHLIGHT" />
</manifest>
iOS
For iOS, you need to do basically the same. First initialize ZXing, by adding one line of code in your AppDelegate.cs in the FinishedLaunching method. This class will look like this.
Register("AppDelegate")]
public partial class AppDelegate : global::Xamarin.Forms.Platform.iOS.FormsApplicationDelegate
{
    public override bool FinishedLaunching(UIApplication app, NSDictionary options)
    {
        Xamarin.Calabash.Start();
        global::Xamarin.Forms.Forms.Init();

        //Add this line of code
        ZXing.Net.Mobile.Forms.iOS.Platform.Init();
        LoadApplication(new App());

        return base.FinishedLaunching(app, options);
    }
}
To add the right permissions, you need to add the NSCameraUsageDescription key to the info.plist file. In Visual Studio, right-click on the file and select View Code. The value of this key is the description that you want to show to the user. The file will look like this.
<?xml version="1.0" encoding="UTF-8"?>
<!DOCTYPE plist PUBLIC "-//Apple//DTD PLIST 1.0//EN" "http://www.apple.com/DTDs/PropertyList-1.0.dtd">
<plist version="1.0">
  <dict>
     ...
    <key>NSCameraUsageDescription</key>
    <string>Please allow access to the camera to scan barcodes</string>
  </dict>
</plist>
Creating the Scanner Page
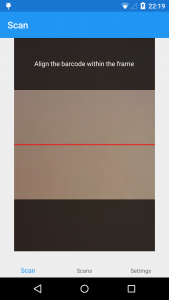
To create a custom layout, you use the ZXingScannerView. This is a sizeable component. With the ZXingDefaultOverlay you can add text above and/or below the scanning area. The XAML code will look like this.
<?xml version="1.0" encoding="UTF-8"?>
<ContentPage xmlns="http://xamarin.com/schemas/2014/forms"
xmlns:x="http://schemas.microsoft.com/winfx/2009/xaml"
xmlns:d="http://xamarin.com/schemas/2014/forms/design"
xmlns:mc="http://schemas.openxmlformats.org/markup-compatibility/2006"
xmlns:zxing="clr-namespace:ZXing.Net.Mobile.Forms;assembly=ZXing.Net.Mobile.Forms"
mc:Ignorable="d"
x:Class="MyApp.Views.ScanPage"
Title="{Binding Title}">
<ContentPage.Content>
<Grid VerticalOptions="CenterAndExpand"
HorizontalOptions="CenterAndExpand">
<zxing:ZXingScannerView x:Name="scanView"
OnScanResult="scanView_OnScanResult"
IsScanning="True"
WidthRequest="300"
HeightRequest="500"
VerticalOptions="CenterAndExpand"
HorizontalOptions="CenterAndExpand"/>
<zxing:ZXingDefaultOverlay TopText="Align the barcode within the frame"/>
</Grid>
</ContentPage.Content>
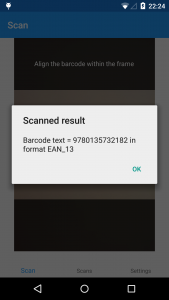
</ContentPage>The ZXingScannerView has two important items: IsScanning and OnScanResult. The first one is a boolean that indicates (as the name implies) if the scanner is searching for barcodes. The other one is the event that gets fired when a barcode is read. In the code-behind, you specify what needs to be done when this event fires. In this case, it only shows an alert with the scanned text and the barcode format.
public void scanView_OnScanResult(Result result)
{
    Device.BeginInvokeOnMainThread(async () =>
    {
        await DisplayAlert("Scanned result", "The barcode's text is " + result.Text + ". The barcode's format is " + result.BarcodeFormat, "OK");
    });
}
When you run the app on a device or a simulator/emulator, you first get the page to scan a barcode. To actually test the barcode scanning, you will need a physical device since the iOS simulator or Android emulators will not give you access to a camera.
When you scan a barcode, an alert gets displayed with the barcode text and format.
And so we have a working scanner in our Xamarin.Forms application for iOS and Android. You can find my code on my GitHub.
Hi Lindsay,
Just wanted to thank you for this post. I’ve spent a day looking for ways to do this and didn’t get very far. Your post cleared it right up 🙂
One quick point though, Zxing did not detect and barcodes before I set “IsAnalyzing=true” in the xaml file. This was the case with your sample app on github too.
Thanks again,
Mark
Great article, thanks! Very accurate and easy to follow. Great job!
Hi. This is a great example. I have one issue though and i’m not sure if it’s more a Xamarin issue or ZXing, but if create (push) a page with the scanner on it and then I pop that page later, the camera still runs. Is there a way to prevent this? Only happens on IOS, android destroys the page.
Hi
Thanks so much for this simple to follow guide. It’s been a great time saver for me.
Thank you for the article. However I get a ‘zxing.portable’ can not be referenced. How do I solve that?
Hi, here is a solution with the same problem as yours: https://github.com/Redth/ZXing.Net.Mobile/issues/787
Hi
Thanks so much for this simple to follow guide.
Hello, thanks for this tutorial. it was really easy to follow and understand parts for a new xamarin user like me.
can you suggest sth about my problem which is:
i want to read the QR and then open the link comes from QR in browser. ( this i’ve done it already)
but if i close the browser and return to my app :
a) in this version nothing happens since isScanning becomes false the app-camera doesnt read any more
b) since i m opening a new app ( browser) my ap goes for sleep and when i come back from browser, my app should continue with OnResume stationed in App.xaml. there, i made a line : MainPage = new MainPage();
this one works but it reloads the main page (where my camera read happening) which is costing time ( i m testing it in an old device and it is not that strong or fast)
do you have suggestions which my app continues where i left off and at the same time continues to scan more QR’s as well. Thanks in advance
Hi
minimun Android and iOS SDK required or not?
Thanks in advance
I had dug myself into a pit and yours helped me get out. Works great from a good post. Thanks
Is there any way to convert same code in Qrcode scanner, or i need to see for different approach.
It doesn’t work on iOS, can you help?
It works for barcodes, but not qrs. pls help?¡
thank you very much, your post is very helpful
thank you, simple and effective
Any advise on handling qrcode with timestamp or something with timing.